 English
 日本語
日本語Wall production and repair
In Japan, two main types of house construction are commonly used: wood-frame and reinforced concrete houses.
For reinforced concrete houses, walls and partitions are usually framed with wood or lightweight steel, with insulation placed between the frames. Plywood or plaster boards are then applied, and wallpaper is used to finish the walls. Since Tadao Ando's architecture gained fame, it's become trendy to leave concrete exposed during renovations to create a rugged, spacious look. While this style works well for stores and galleries, it can cause issues in living spaces, such as reduced thermal efficiency, poor soundproofing, and possible condensation on the concrete. Therefore, careful consideration is needed before making such renovations in a home.
Wood-frame houses have two types of walls: clay walls and walls made from boards attached to wooden frames, such as wooden pillars. Since the 1960s, more homes have been built with plywood or plasterboard over wooden studs, using methods like 2x4 or conventional construction. Traditional clay walls, however, take a long time to complete. First, bamboo and straw rope are woven to create a framework, and then a layer of clay is applied and allowed to dry for several months. After the first layer dries, a second layer is applied and allowed to dry again. Finally, plaster and other finishes are added, a process that can take several months to a year to complete.
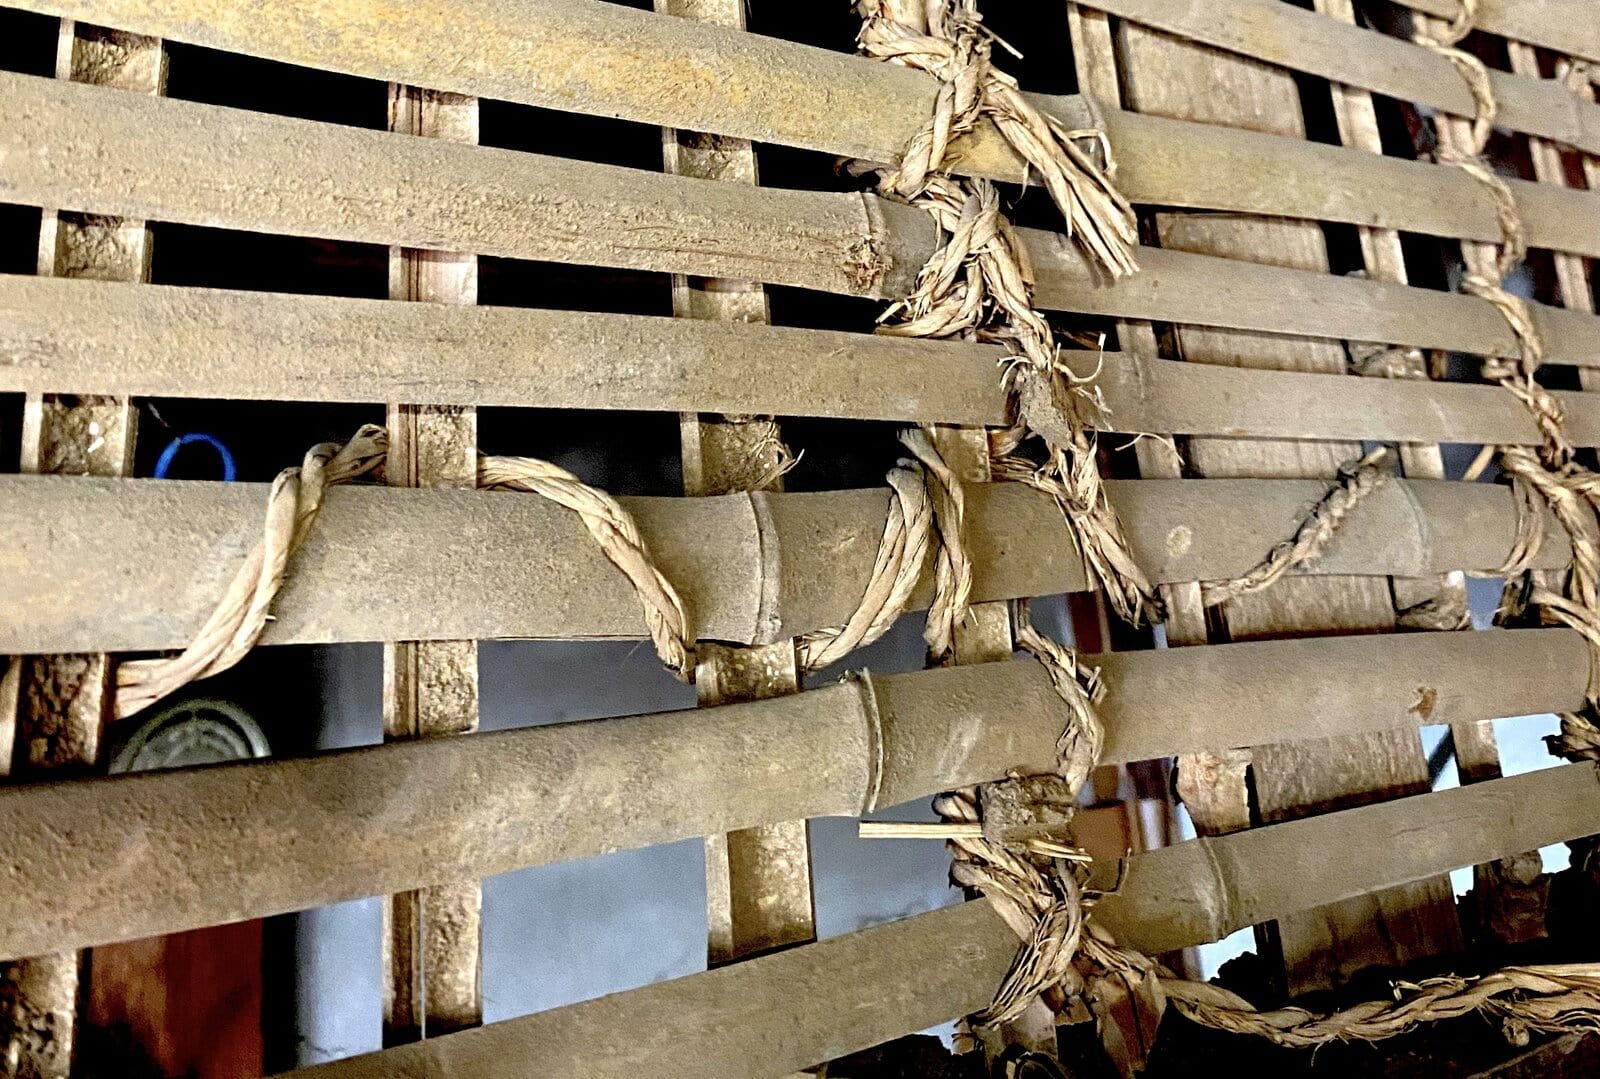
The mesh framework of clay walls, woven from bamboo and straw rope, is called Take-komai (竹小舞).
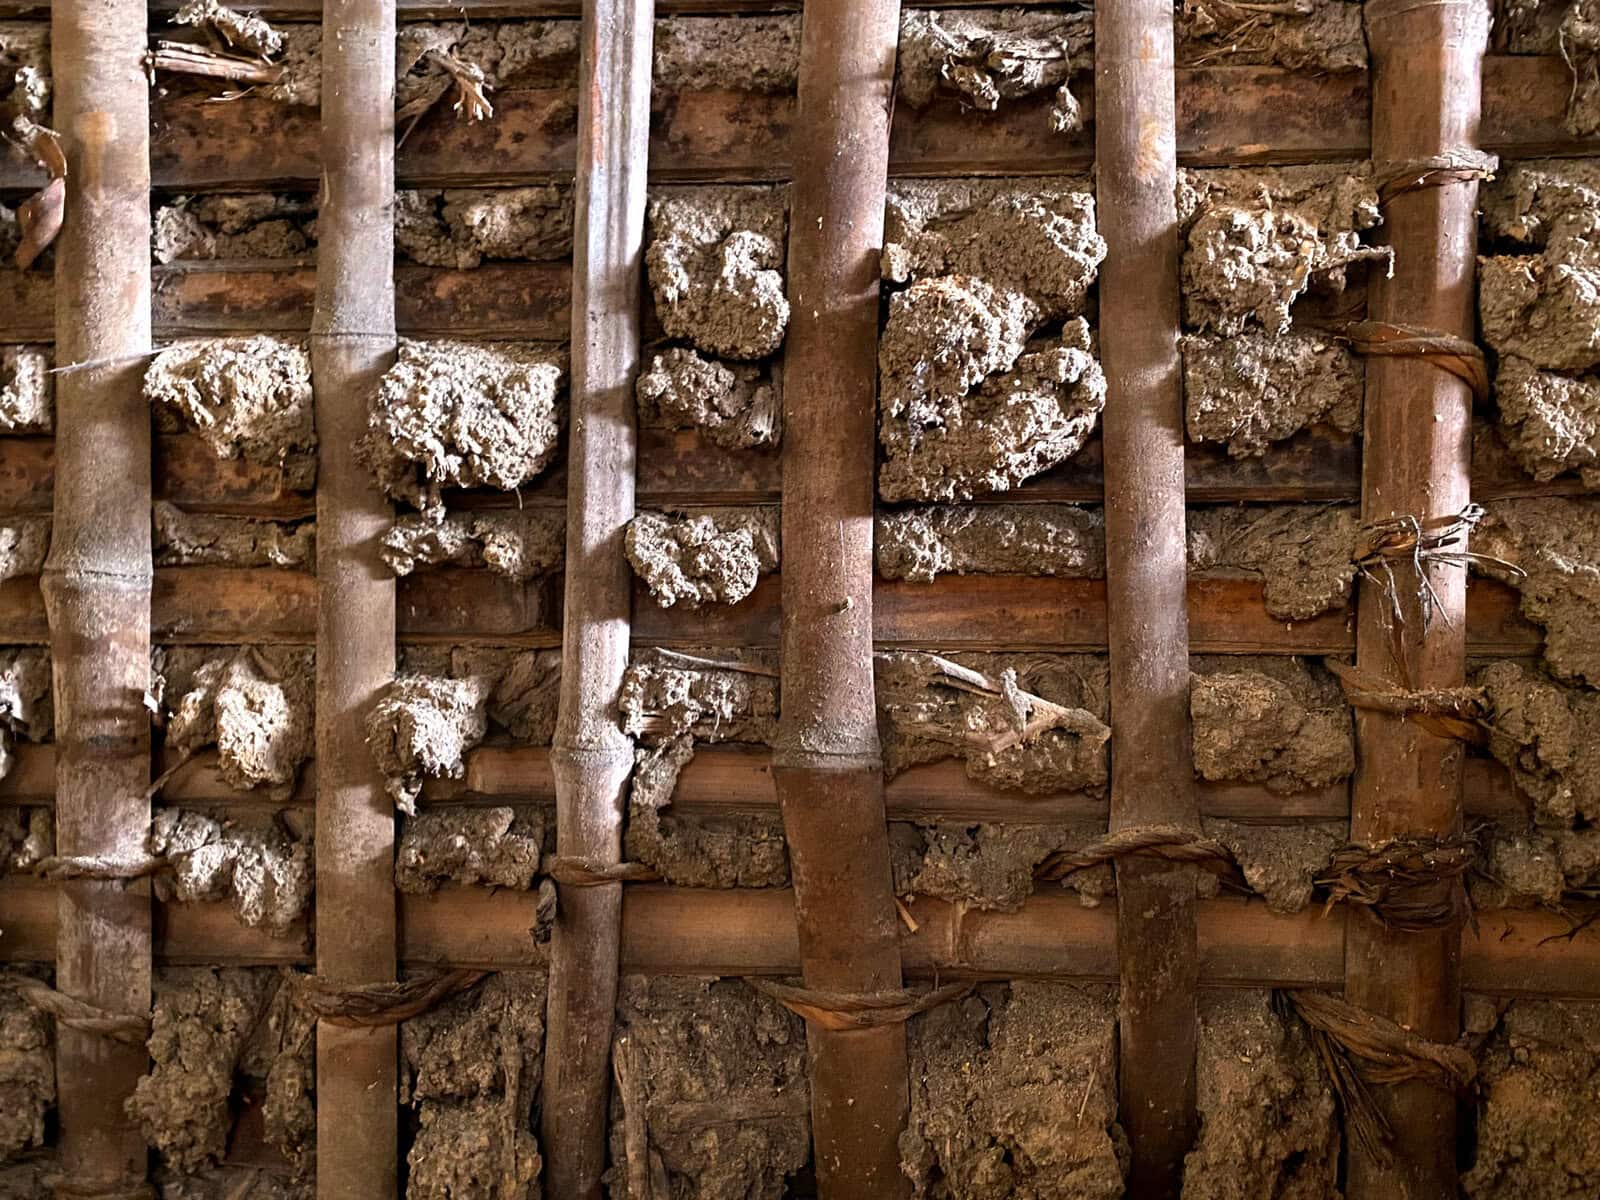
The first layer, known as Ara-kabe (荒壁), is created by coating a bamboo mesh with clay.
As Japan’s construction industry modernized, the push to shorten building times to reduce costs led to fewer clay walls being built. Today, there are fewer craftsmen who can make earthen walls, and fewer companies sell the materials needed for them. Many Japanese-style houses are now finished with plasterboard or other surface treatments instead of traditional clay walls.
A material resembling clay walls is applied over plywood that has been treated with a sealer.
With the popularity of air conditioners, more people have moved away from clay walls, especially because they can feel drafty. Many older homes have been remodeled by covering clay walls with thin plywood or wallpaper. However, as concerns about "sick building syndrome" (a health condition related to poor indoor air quality) have increased, the humidity control and ventilation benefits of clay walls have been reconsidered. In recent years, clay walls have made a comeback, but it's important to note that the typical repairs―like sealing the wall before adding a new layer of plaster―can reduce the wall's ability to control humidity and allow air to pass through.
When sealing a clay wall before adding plaster, the old clay’s ability to absorb dirt and stains, such as cigarette smoke or rain spots, may cause these stains to bleed through to the new plaster. Using a sealer creates a barrier between the old clay and the new plaster, preventing stains from coming through. However, this process also stops the old clay from performing its natural function of regulating humidity and air flow. To preserve the original function of the clay wall, it’s best to either apply a material that hides stains or use a high-performance sealer that maintains the wall's natural properties. But if proper ventilation isn’t maintained after sealing, the sealer can contribute to indoor air quality issues.
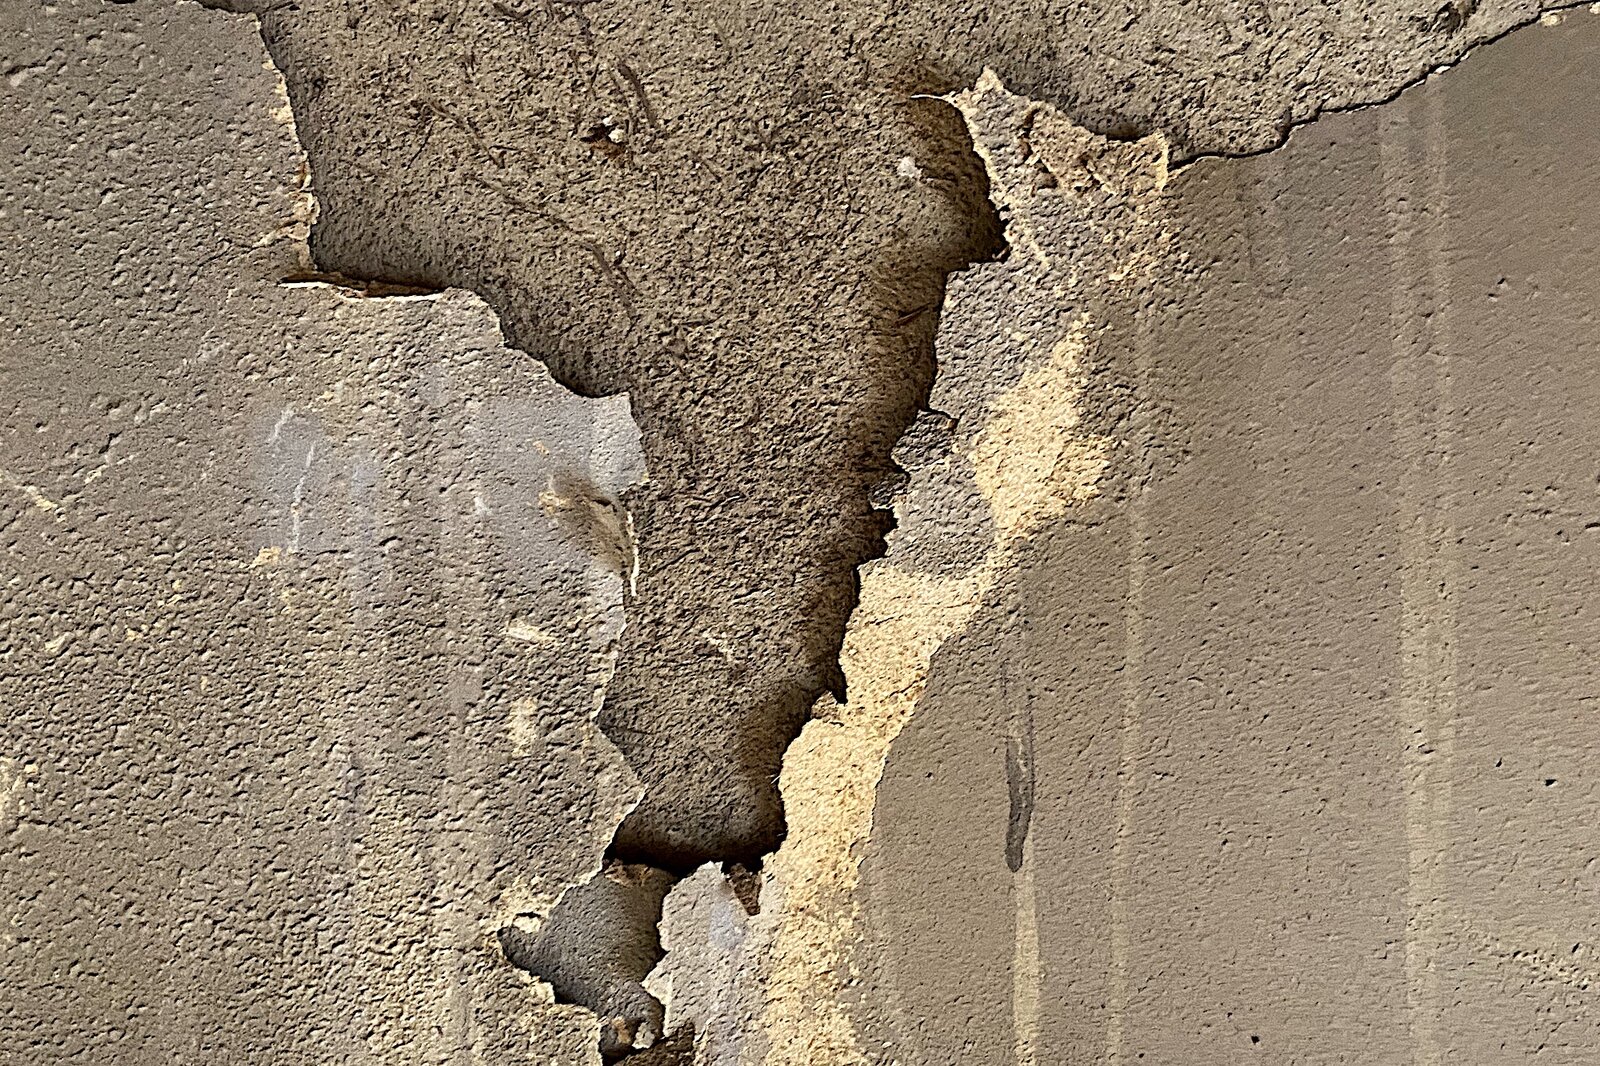
The plaster is peeling due to a rain leak. In such cases, even if the old plaster is removed and replaced, stains from the leak may still appear.
When repairing a clay wall, if there is an unneeded clay wall in the floor plan, the unneeded wall can be torn down, and the soil from it can be reused to repair the wall.
To reuse the clay, first, sift the soil to separate it from any plaster or other materials applied to the surface. Then, soak the soil in water for a period of time to return it to its original mud-like consistency. During this process, the fine straw that will be mixed into the clay should also be soaked in a separate container.
The purpose of soaking the soil and straw is to remove any scum, such as cigarette tar, kitchen oil, and stains caused by rain or other sources, that has absorbed into the materials. It’s advisable to soak the soil and straw for at least a month, changing the water multiple times if possible. This long soaking period helps remove these impurities, ensuring that the soil and straw will perform properly when used in the clay wall.
If you’ve purchased pre-treated straw that has already been cleaned of scum, there’s no need to soak it for an extended period. Once soaking is complete, discard the excess water and mix the soil and straw to achieve a good consistency before use.
Reclaimed clay can also be used as a surface finish. However, because the clay used for interior layers is more coarse and less durable than plaster, a thin layer of clay might peel off or crumble over time, which can cause dust. For this reason, extra care should be taken when using clay for surface finishes. If you don't have enough reclaimed soil, you can purchase new clay for wall construction from online stores, but be aware that large orders may require extra delivery fees or may not be delivered directly to your home. Some online stores only sell to contractors, so it may be necessary to buy through a local building materials store or installer, which could add additional costs.
When applying new clay to an existing clay wall, it's important to clean the wall of dust and mist the surface with water to ensure good adhesion. Without moisture, the new clay will not stick well and will peel off quickly. Keep in mind that differences in thickness and drying times, as well as the natural shrinkage of clay, can cause cracks to form on the surface. Applying clay smoothly requires skill, so don't worry if cracks appear at first. It’s part of the process and can even be part of the charm. If mistakes happen, it’s easy to fix. Just scrape off the clay and start again!

